Strong Grip

Canon Digital Rebel
EF 35mm 2.0 Lens

It is a bit of challenge to hold a baby's hand and tried to take a picture too! This is what comes out.

Shot RAW processed via Canon DPP
Storyboard assembled in Adobe Photoshop
Coloring with Nik EFEX Filters

Comments and Critiques appreciated

Bundle of Joy #2


Tristan Christopher Cox
Look out world here I come!
Dublin, California


Canon Digital Rebel
EF 35mm 2.0 Lens

Shot RAW processed via Canon DPP
Storyboard assembled in Adobe Photoshop
Coloring with Nik EFEX Filters

Comments and Critiques appreciated

April 2007


San Francisco
California


Just having some fun with Photoshop with this one. I was trying for a comic book sort of feel. I rather like it myself...


Super Takumar 50mm f/1.4

My all time favorite 50mm lens

I recently got some free Nik Effects color filters. Here I am playing around with the pop-art filter.

You can download some for free here: http://www.niksoftware.com/welcome/americanphoto/usa/entry.php?utm_campaign=americanphoto&utm_source=Ma r_06&utm_medium=redire
or:
http://www.niksoftware.com/welcome/r.../usa/entry.php


Jet Plane
Houston, Texas


Some more fun with Photoshop.

February 23 2007

Although I am not getting to a shot a week right now, I am getting some great shots that I will share as I get them processed.
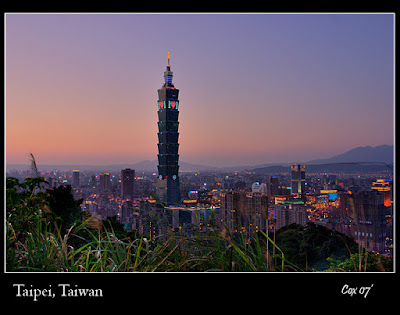


Taipei, Taiwan
Formosa, Republic of China

Canon EOS Digital Rebel / EF 17-40mm
f-8 / 1/3 sec. / 200 ISO


Shot RAW and processed via DPP.

My skill as a landscape photographer and Post Processor are rather poor. Portraits seem to be my strong area. This shot is an exception to my otherwise weak landscapes, maybe I am getting better, maybe I am getting lucky!

Finally got a clear evening on my last nite in Taipei. 30 or so other photographers and I all happily snapped away from this great vantage point above the city. The building in the middle is called the Taipei 101. Currently it is the worlds tallest building, it was completed just a couple of years ago. The Taipei 101 tower is lit up special for valentines day, which had occurred a few days before I shot the photo.

Last year they had fireworks shooting out of the building for new years eve!

No filter was used. There was a streetlight nearby that was throwing reflections into the filter, even with the lens hood on! so I took the filter off.

One pretty serious well equipped gentleman taking shots next to me was using a large 6x8 sheet of graduated glass (clear gradually becoming dark) that he held in front of the lens. He was setup long before the street light came on.

I made 5 exposures on a tripod and blended them to get the same thing a graduated ND filter would give me.

There were quite a few photographers that day, it was day 6 of a national 7 day Holiday, for Chinese new year, and the weather was bad until just this day. So everyone hopeing to shoot this week must have come up to the little hilltop. To get to this vantage point requires a 300m near vertical climb up a nice granite staircase. 20-30 min for me, so give yourself some time. And bring a tripod! If anyone is interested I can provide directions to the park with the scenic overlook where this was taken.
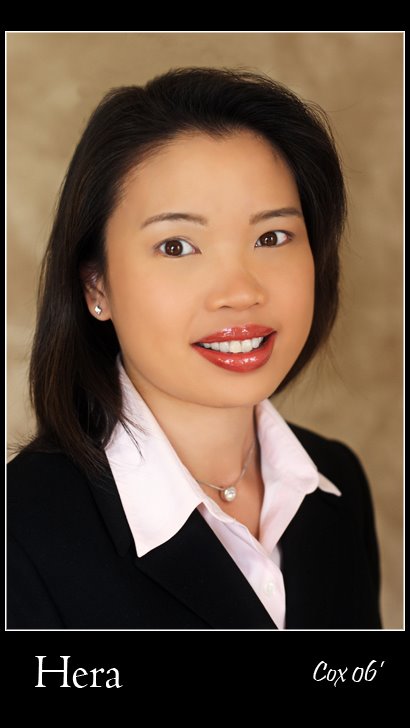
Missing photos on blogger...

It seems most of my recent photo posts have had the photos made invisible by blogger. Apparently uploading new ones does not help either. I hope this is only temporary.

Equipment Leasing for Photographers

One reason the 2007, weekly photo has not occurred yet this year is a project I have been working on this year with my wife Annie.
Annie set up her own company Chang Team to serve the commercial real estate, equipment leasing, and factoring financing clients. Since she has access to nearly unlimited sources of capitol and lenders, and was already offering business equipment leasing, I helped set up a program designed especially for helping photographers, studios, and labs.
I set-up a website and am now working on a marketing strategy that reflects Annie's Chang Team principals: high quality customer service, attention to detail, and a friendly environment.

For now this project has taken some of my time away from photography but not completely. I am still learning in leaps and bounds in the ability to post process my images. I think I will make 2007 a year to blog about these new skills I am acquiring. My latest photoshop efforts have been to build a banner advert for the Chang Team Photographic Equipment Leasing project.


If you are interested to see the site just click the banner. I learned a bit about selection tools and using text in photoshop with this project and would probably do it a bit different if I was to do it again.

Some Statistics for 2006

Portraits - 26
Sabrina - 14
Family - 10

Landscape - 13
Airplane - 16
Camera - 4
Boat - 1

Lenses:
Canon 17-40mm 4.0 - 23
Canon 70-200 4.0 - 15
Canon 35mm 2.0 - 6
Canon 50mm 1.4 - 5
Leica 50mm 2.0 - 3
Canon 18-55 - 1
Canon 100-300 - 1
Canon 100-300L - 1
Russian 50mm 1.4 - 1
Nikon 50mm 1.4 - 1
Takumar 50mm 1.4 - 1

December 31, 2006


Sabrina at Christmas
Dublin, California

Canon EOS Digital Rebel / EF 17-40mm @ 29mm
f-4 / 1/30 sec. / 200 ISO

Shot RAW and processed via DPP. Additional processing done via PhotoShop CS2. Red Paw's free filters and the Shadow Highlight tool were used primairly.


This is the final entry for 2006! Yeay!!! I have done rather well for my first year. I plann to take a little break and begin again in spring 2007

See you then...

December 24, 2006


Wesley Hsu
Legoland
Carlsbad, California


Canon EOS Digital Rebel / EF 70-200mm @ 131mm
f-4 / 1/160 sec. / 100 ISO

Shot Raw and processed via Canon's DPP. Additional work done in Adobe Photoshop CS2.

December 21, 2006


Eva Air 747
Los Angles, California

Canon EOS Digital Rebel / EF 70-200mm @ 200mm
f-7 / 1/640 sec. / 100 ISO

Shot Raw and processed via Canon's DPP. Additional work done in Adobe Photoshop CS2.

December 13, 2006


Above Dallas
Dallas, Texas

Canon EOS Digital Rebel / EF 17-40mm @ 17mm
f-4.5 / 1/50 sec. / 100 ISO

Shot RAW and processed via DPP. Additiinal processing done via PhotoShop CS2.

November 29, 2006


Jelly Bean
JellyBelly Factory
Fairfield, California


EOS Digital Rebel / EF 35mm 2.0
f-2.0 / 1/400 sec. / 400 ISO

Shot as Large Jpeg and processed via PhotoShop CS2.

December 3-9, 2006

No photos taken this week. Here are a couple of older ones I have been working on.

Ah-Ma & Ah-Gong
Gold Mountain, Taiwan

Canon EOS Digital Rebel / EF 17-40mm @ 40mm
f-4 / 1/25 sec. / 400 ISO


Shot RAW and processed via DPP. Run through Portrait Professional then touched up and adjusted in PS-CS2, including the free Red-Paw Media filters. This software and it was prety fun and easy. A free demo is available on there website.


NYC from EWR
Newark Liberty Airport, New Jersy

Canon EOS Digital Rebel / Canon EF 100-300mm f/4.5-5.6 @ 300mm
f-18 / 1/200 sec. / 200 ISO

Shot as Large Jpeg and processed via PhotoShop Elements 2.0. Additional processing via PhotoShop CS2.


November 23, 2006


Tahoe
South Lake Tahoe, California

Canon EOS Digital Rebel / EF 17-40mm @ 17mm
f-7 / 1/100 sec. / 100 ISO

Shot raw and processed via Canon's DPP. I am getting better with this program and can now competently use all the sliders in the raw adjustment panel in harmony. The new DPP tutorials at photoworkshop.com helped as well as a year of practice. I am still weak on the RGB adjustment panel and need more experience with curves to really use this feature well.

Adjusted in PhotoShop CS2. This particular shot really benefited from the shadows/highlights tool to bring the people out of the shadows. I learned a lot from schmoelzel's tutorial on the POTN forum. You can find it here:


November 12-18

Matterhorn
Switzerland

Leica M6 TTL / Leitz 50mm Summicron / Mason Telephoto Filter
f-4 / 1/160sec. / 50 ISO
Fujii Velvia

Film scan via Fujii scanner. Processed in photoshop CS2.


Luzern
Switzerland

Leica M6 TTL / Leitz 50mm Summicron
f-4 / 1/60sec. / 50 ISO
Fujii Velvia

Film scan via Fujii scanner. Processed in photoshop CS2.


No potos were taken this week, so I worked on a couple older photos.


November 11, 2006


Sunny
Las Vegas, Nevada

Canon EOS Digital Rebel / EF 17-40mm @ 40mm
f-4 / 1/40 sec. / 400 ISO


Shot RAW and processed via DPP. Run through Portrait Professional then touched up and adjusted in PS-CS2. This was my first try with this software and it was prety fun and easy. A free demo is available on there website.


October 31, 2006


Sabrina with Candy
EOS Digital Rebel / EF 35mm 2.0
f-2.0 / 1/30 sec. / 800 ISO

Shot RAW and processed via DPP. Touched up and adjusted in PS-CS2

October 28, 2006


Fun at the Farm
Livermore, California

EOS Digital Rebel / Nikkor 50mm 1.4
f-1.4 / 1/800 sec. / 100 ISO

Shot Raw and processed via Canon's DPP. Additional work done in Adobe Photoshop CS2.

This is my first outing with the Nikon AIS 50mm 1.4 Nikkor lens. Wide open it has a very pleasing softness which is good for portraits. Bokeh seems a bit distracting, but most all the out of focus areas have been cropped out of this shot.

A major advantage of the EOS camera system is a relativly thin body capable of adapting lenses from other thicker bodied systems. (in the case of the EOS this is most others...) Inexpensive adapters are available to mount these lenses. There is a near complete loss of automation with these lenses but AV & M modes remain available. I have quite a few Nikon - Nikkor lenses and Pentax - Takumar lenses that see regular use on my EOS.

Also worth mentioning again, Canon's DPP has a new and very nice online tutorial. It is long overdue but since it is here now go check it out... http://www.photoworkshop.com/canon/dpp2/index.html

October 15-21


Mei Mei
California

Photoshop Pencil Portrait

Original Image
9/17/05

EOS Digital Rebel / Super Takumar 50mm 1.4
f-2.0 / 1/50 sec. / 400 ISO


Playing around with a new hi-key pencil portrait technique.

Thanks to Brian Duckett's tutorial for getting me started....
http://www.duckettphoto.com/lessons/pencil/index.htm

I am happy with the results, but of course will improve with some practice.

October 12, 2006


Seoul, Korea at Dawn
South-Korea

Canon EOS Digital Rebel / EF 17-40mm @ 40mm
f-4 / 1/15sec. / 200 ISO

3 photos Shot Raw and processed via Canon's DPP. The 3 photos were stitched together with Canon's Photo Stitch software. Adobe Photoshop CS2 was used to sharpen and color correct the image. I used Captain David Raboin's advice on bringing out the best in a cityscape. I will post it below since it is a rather obscure link...

http://photography-on-the.net/forum/showthread.php?t=75951&highlight=Aerial+Photography-+HAZE%21%21

Dave's Advice on Cityscapes:

My trick for cityscapes is to sharpen way way more than I would for a normal pic. Before I do anything to the photo I run it though unsharp mask two to four times. The first time I set the levels to amount 150, radius 1.5, threshold 1.0. Those numbers are huge, but it works. I then sharpen it again at amount 20, radius 50, threshold 0. After that I may sharpen it one more time depending on how the pic looks. It is an art. Experiment. If you screw up just hit the undue button.

After sharpening, I crank up the contrast. I am extreme with the contrast too. I'll set the slider anywhere from +20 to +40. It all depends on the photo. Play with it a bit.

The last step is to play with the colors and levels. Most the pics I take out the window have a strange color cast and the levels are all wrong. I've found that most of my pics need the midtones and shadows darkened and the highlights lightened. This is also an art and totally depends on the photo. One of the strange things I've found is that I have to add a lot of red in either the midtones or shadows. If you can't figure out why your pic doesn't work try adding red. Same goes for reducing green. Sometimes taking out a little green makes a huge difference. As for the highlights, they are different. I find they need blue added to make things look natural. A lot of times the highlights will have a slightly red or green cast that needs to be removed.

If the picture has a lot of trees or water, use the magic wand tool to select the trees or water and then correct those colors seperately. I've found tree need lots of green added. Water is a nightmare. Good luck with that.

After doing all this, I will try auto levels. If you did things right, when you hit the auto levels comand only slight changes will be made. I find the auto levels smooths out the rough edges and makes the pic look more natural. Why not just hit auto levels to start with? Most of my pics from the air are so screwed up that auto levels doesn't have a clue what to do to fix things. Auto levels really doesn't help until you have your photo fixed manually.

Here's a before and after so you can see the massive amount of editting that goes into my cityscapes.

Before: http://www.pbase.com/rbndave/image/43483440
After: http://www.pbase.com/rbndave/image/36933356

I forgot the most important part. You have to start with a fixable photo. Make sure the sun is front or side lighting the buildings. Also, haze is the killer. If it's hazy don't even bother getting out your camera. I get my best pics in the morning and evenings shortly after cold frontal passage.

Another trick is to use your sunvisor to block out glare. On the CRJ our sunvisor is detachable. I take it off the slider and hold it under the camera at the base of the window to shield any out any reflections. Before I figured out this trick I had a bunch of pics with reflections of approach plates or glare from the latches on my flight bag. The sunvisor trick made this Chicago photo possible. http://www.pbase.com/rbndave/image/42048657

Hope that helps.

Take your camera on every trip.

Dave

Come see my gallery at: http://www.pbase.com/skysaddle/profile


October 01, 2006


Hera
California

Canon EOS Digital Rebel / EF 50mm
f-2.5 / 1/50sec. / 200 ISO

Took some headshots of our friend Hera.

Shot Raw and processed via Canon's DPP. Additional work done in Adobe Photoshop CS2. Again I would like to thank the great techniques given by mizuno (Dan Cripps?) over at POTN forum
http://photography-on-the.net/forum/showthread.php?t=171753

September 27, 2006


Chicago
Illinois, USA

Canon EOS Digital Rebel / EF 70-200mm @ 70mm
f-13 / 1/640 sec. / 400 ISO

2 photos Shot Raw and processed via Canon's DPP. Sticthed together with Canon's Photostitch Additional work done in Adobe Photoshop CS2.

September 17-23, 2006

No photos were taken this week, so I would like to share a collage of older photos. These were taken from 1998-2001 on and around the Beechcraft 1900D Airliner. The shots were taken with a Canon A50 & S100, early model point and shoot digicams.


September 16, 2006


Chang Team
California

Canon EOS Digital Rebel / EF 17-40mm @ 40mm
f-4 / 1/15sec. / 100 ISO

Took some headshots of Annie for her Commercial Real Estate website, ChangTeam.com
She also has a couple of articles being published soon in trade magazines and my photo will accompny them.

Shot Raw and processed via Canon's DPP. Additional work done in Adobe Photoshop CS2. I applied the great techniques given by mizuno (Dan Cripps?) over at POTN forum
http://photography-on-the.net/forum/showthread.php?t=171753


September 8, 2006


Nikon F2 SB

Canon EOS Digital Rebel / EF 17-40mm
f-8 / 20 seconds / 100 ISO

This is a collage of 3 different photos. The camera was on a tripod due to the 20 seconds used for exposure and so I could overlay each shot in Photomatrix. I shot in a nearly dark room at night with only a little moonlight. To spot illuminate the Nikon F2SB I used a backlit i-paq PDA. This allowed me to cast light creativly, sort of painting with the soft glow from the PDA.

Shot RAW and converted via Canon DPP. Converted into a single image via Photomatrix. Tone mapped via Photomatrix, additional post processing via Photoshop CS2.

September 6, 2006


Omaha
Omaha, Nebraska

Canon EOS Digital Rebel / EF 50mm

f-1.4 / 1/30sec. / 800 ISO

Shot RAW and converted with Canon DPP, additional post processing, Layers, Cloneing, dodging, burning, via Photoshop CS2.

August 13 - September 3

The camera stayed in the bag for a couple of weeks. I will share some photos that I had taken in the past but I am just getting around to processing...

El Paso, Texas

Canon EOS Digital Rebel / EF-S 18-55mm @ 55mm
f-9 / 1/160sec. / 100 ISO

Shot RAW and converted from a LDR to HDR via Photomatrix. Tone mapped via Photomatrix, additional post processing, Layer mask, dodging, burning, curves via Photoshop CS2.


St. Moritz
Switzerland

Leica M6 TTL / Leitz 50mm Summicron
f-4 / 1/160sec. / 50 ISO
Fujii Reala

Film scan via Microtek flatbed scanner. Processed in photoshop CS2.

August 09, 2006


A Ship in the Fog
Los Angeles, California

Canon EOS Digital Rebel / EF 70-200mm @ 200mm
f-10 / 1/1000 sec. / 400 ISO

Shot Raw and processed via Canon's DPP. Additional work, Cropping, adjustment layer, done in Adobe Photoshop CS2.

Less errors???

It appears the trouble I was having with the scripts has stopped being a problem with the MS-IE browser. Or at least not appearing nearly as often as it does with firefox. Hopefully this is something Blogger is working on, since I never got a response from them or a solution in the fix it forum.

I appreciate everyone who took time to look into it for me.

If anyone does figure out what is causing it, or better yet has a way for me to fix it, please let me know.

New Blogger Beta...

I have migrated the blog to the New Bloger Beta. This has unfortunatly created a problem for browsers loading the page.

when you visit my blog everything is locked up /frozen until an error
box pops up saying

"a script on this page may be busy or it may have stopped responding.
You can stop the script now or you can continue to see if the script
will complete.

[stop script] [continue]"

Everything stays frozen until the stop script button is selected....

I wrote to bloger help but have got no response.

I have also posted the above with a plea for help on the blogger help forum here:
http://groups.google.com/group/blogger-help-troubleshoot/browse_thread/thread/421a52495c04f1ae/?

What is causing this?

If anyone knows, what should I do?

August 06, 2006


Grapes
Wente Vinyard
Livermore, California

Canon EOS Digital Rebel / EF 17-40mm @ 17mm
f-9 / 1/200sec. / 200 ISO


Sabrina and Grandmother, checking out the grapes and having fun!

Shot raw and cross processed via DPP and Photomatrix. Additional Layers were added using free plug in's from Red Paw Media Photoshop CS2 was used to dodge and burn, correct color, and combine the many many layers that were created.

August 02, 2006


Alaska Airlines 737
Los Angeles, California

Canon EOS Digital Rebel / EF 50mm 1.4
f-5.6 / 1/800sec. / 100 ISO


Horizon Airlines Q-400
Los Angeles, California

Canon EOS Digital Rebel / EF 50mm 1.4
f-7.1 / 1/1000 sec. / 200 ISO

Shot Raw and processed via Canon's DPP. Additional work done in Adobe Photoshop CS2. Taken at LAX airport from the parking lot of IN-N-OUT burger. An excellent spot for takong pictures of airplanes, as well as great burgers.

July 23, 2006


Ghirardelli Square
San Francisco, California

Canon EOS Digital Rebel / EF 17-40mm @ 17mm
f-7.1 / 1/125sec. / 400 ISO

Shot RAW and converted from a LDR to HDR via Photomatrix. Tone mapped via Photomatrix, additional post processing via Photoshop CS2.

This sureal photo is a result of a tone mapped (High Dynamic Range) HDR image. Basically the shadows and highlights are both exposed properly via the Photomatrix software. The resulting image can range from realistic to sureal and the Photomatrix software makes it easy to make adjustments to your likeing. A good tutorial (how I learned to use it) is here...
http://petemc.net/hdr-guide/

I will get around to fixing my typo at some point...

July 12, 2006


Skipper
Oceanside, California

Canon EOS Digital Rebel / EF 70-200mm @ 70mm
f-8 / 1/320 sec. / 100 ISO

Shot Raw and processed via Canon's DPP. Additional work done in Adobe Photoshop CS2. Canon's DPP has a new and very nice online tutorial. It is long overdue but since it is here now go check it out... http://www.photoworkshop.com/canon/dpp2/index.html

July 5, 2006


World Cup
Italy vs. France Semifinal
Manhatan Beach, California

Canon EOS Digital Rebel / EF 17-40mm @ 17mm
f-5.6 / 1/40sec. / 400 ISO

Shot RAW and processed via DPP. Frame added in PS CS2.

June 29, 2006


Surfer
Hunnington Beach, California

Canon EOS Digital Rebel / EF 70-200mm @ 200mm
f-7.1 / 1/500 sec. / 100 ISO

Shot RAW and processed via DPP. Additional sharpening, color correction and a frame added in PS CS2. Photomatrix was used to create a tone mapped layer, in an attempt to bring out details in the water. This file was a result of many different layers combined in PS CS2.

June 18-24

Sometimes you just don't pick up the camera for a while.

I will use this week to look back on my progress over the last 6 months. First I would like to say that making this blog has been very simple, blogger.com provides these for free and it is as simple as writing an e-mail. If you are considering starting your own blog, go do it, it is very simple.

When I began this Photo A Week project I wrote:

"I hope to take,
process, and post a photo here every week. Hopefully it will be a fun challenge for me to do this. I also hope to document how I worked on the posted photo. I think it will also help me document my growth as an artist..."

Although I tend to get behind on my processing an
d posting a little, I have been able to take some pictures each week, and I certainly have learned so much. I have seen the largest increase in knowledge with my post processing. I began by using PhotoShop Elements 2.0 and now am using PS CS2. There is so much to learn with this program that it is no surprise. I still have so much to learn...

Having to choose 1 photo a week has also helped me to
better analyze my shots and developed a more critical eye. The fact that I am doing something every week also helps, new techniques stay with me better if I use them regularly.

I think this project has been very successful so far. I have
improved myself and my photos, the blog makes it very nice to be able to mark my progress. Again I would highly recommend this type of blog to any photographer regardless of skill level.

I would also like to thank all the helpful members over at the POTN chatroom.
http://photography-on-the.net/forum/

POTN (Photography on the Net) is a Canon oriented chatroom where everyone can share photos and knowledge. I owe much of my current knowledge to the helpful members there.

Since I don't have a photo this week I will post a few older shots...

Click on picture to see the larger version.


June 12, 2006


Swing'n
Dublin California

Canon EOS Digital Rebel / EF 17-40mm @ 37mm
f-10 / 1/400 sec. / 400 ISO

Shot RAW and processed via DPP. Cropeed via DPP. Post processing and frame added in PS CS2.

June 10, 2006


Baby Allan
Dublin, California

Canon EOS Digital Rebel / EF 70-200mm @ 131mm
f-4 / 1/100 sec. / 400 ISO

Shot RAW and processed via DPP. Extensive post processing via PS CS2.

June 2, 2006


757
Newark Liberty Airport

Canon EOS Digital Rebel / EF 70-200mm @ 200mm
f-6.3 / 1/500 sec. / 200 ISO

Shot RAW and processed via DPP. Additional sharpening, color correction and a frame added in PS CS2.

I am slowly getting the hang of using PhotoShop CS2, and Canon's DPP. I have developed my own style of doing things called a "workflow". I am still learning and it changes as I learn better ways of doing things.

My current workflow is as follows:

Shot RAW and processed with Canon DigitalPhotoPro

Brightness = 0.0
White Ballance = Cloudy
Pic Style = Landscape
Histogram levels adjusted for brightness and contrast
Tone = 0
Saturation = 2
Sharpness = 4

Final Processing via Photoshop CS2

1 . I generally start with Auto: Levels / Color / Contrast, and if it improves things I accept it otherwise bact to the original. In this case Auto levels made the sky a better blue color and Auto Contrast made no visible change so I kept it. Auto Color made things worse so I did not use it.

2. I used Shadow/Highlight tool to make some minor adjustments

3. I tried using the High Pass Filter on a new layer to sharpen the image. I do not completly understand how to get this to work. At the normal setting it made things a little sharper but also made things grey! even at 9% opacity it killed my contrast and at 9% not much sharpening was going on. I ended up using soft light at 35% opacity. This seemed to work.

4. I added Contrast +7

5. Resized to 700 pixels wide. Maybe I could do this a better way?

6. Ran a USM, 68 / 5.6 / 21

6. Added the black boarder

7. Saved for the web, Jpg - high

The end.

It will be intresting to look back later and see what changes I make.
If anyone sees ANYTHING I could do, or do better let me know.

May 23,25, 2006


EWR Rush Hour
Newark Liberty Airport

Canon EOS Digital Rebel / EF 17-40mm @ 40mm
f-4 / 1/15 sec. / 1600 ISO

Shot RAW and processed via DPP. Frame added in PS CS2.


Tony & John
Dallas, Texas

Canon EOS Digital Rebel / Russian 50mm 2.0
f-2 / 1/10 sec. / 1600 ISO

Shot on John's camera as a medium Jpeg. Touched up, adjusted and frame added in PS CS2.

May 18, 2006


EMB-145XR
Newark

Canon EOS Digital Rebel / EF 17-40mm @ 17mm
f-4.5 / 1/40 sec. / 800 ISO

4 photos Shot Raw and processed via Canon's DPP. The 3 panel photos were stitched together with Canon's Photo Stitch software. 4th photo of outside was added in Adobe Photoshop CS2, to replace the blown out highlights of the original. Some burning was also done to give the CRT's a uniform exposure.

May 13, 2006


Lets Go!
California

Canon EOS Digital Rebel / EF 100-300mm 5.6 L @ 125mm
f-6.3 / 1/200 sec. / 400 ISO

Shot Raw and processed via Canon's DPP. Additional work done in Adobe Photoshop CS2.

This particular shot relied heavily on the shadows/highlights tool to bring little Sabrina out of the shadows. I learned a lot from schmoelzel's tutorial on the POTN forum. You can find it here:
http://photography-on-the.net/forum/showthread.php?t=95468

I highly recommend POTN to all photographers: http://photography-on-the.net/forum
I have learned so much by visiting, reading what other have to say, and asking questions.

This photo was taken with an early model Professional Canon L lens. More about this rare lens can be found on my camera website: Canon 100-300 5.6 L

May 5, 2006


Hot Shot

Canon EOS Digital Rebel / EF 17-40mm @ 17mm
f-5.6 / 1/60 sec. / 100 ISO

Shot RAW and processed via DPP. Touched up and adjusted in PS-CS2
Fill flash was used to eliminate harsh shadows and to reduce contrast between indoors and outside. This is a bit unusual for me since I prefer available light in almost all cases. This shot worked out well so maybe I will learn to like the flash...

April 27, 2006


Pittsburgh by Air
Pittsburgh, Pennsylvania

Canon EOS Digital Rebel / EF 17-40mm @ 40mm
f-13 / 1/500 sec. / 400 ISO

Shot RAW and processed via DPP. Cropped and adjusted in PS-CS2
On arrival into PIT we could see the city in the distance. Pittsburgh is a very photogenic city and I have taken a number of pictures of it over the years.

April 18, 2006


Sabrina 101
Taipei, Taiwan

Canon EOS Digital Rebel / EF 17-40mm @ 17mm
f-8 / 1/125 sec. / 100 ISO

Shot RAW and converted via DPP. PS-CS2 used for shadow/highlight and sharpening. Sabrina stands outside of the worlds largest building "The Taipei 101" on a very sunny morning. Trying out a new style of frame here too!


FireWorker
Taipei, Taiwan

Canon EOS Digital Rebel / EF 17-40mm @ 40mm
f-6.3 / 1/125 sec. / 200 ISO

Shot RAW and converted via DPP. A crop of about 20% of the frame. PS-CS2 used for shadow/highlight and sharpening. This was taken following a huge detonation of fireworks that temporarily blackened the sky. This man was one of a few who carried an alter through the exploding fireworks into the local temple. He has now lit sticks of incense which he will distribute to his fellow alter bearers, who will use them as offerings of tribute to the goddess on the alter.

April 15, 2006


Annie at the Night Market
Taipei, Taiwan

Canon EOS Digital Rebel / EF 50mm 1.4
f-2.5 / 1/125 sec. / 400 ISO

Shot Raw and processed via Canon's DPP. Additional work done in Adobe Photoshop CS2. A new piece of software for me. It can be downloaded for "free for 30 days" from Adobe's website.

April 4, 2006


Canon EOS Digital Rebel / EF 70-200mm @ 200mm
f-14 / 1/30 sec. / 200 ISO

March 24, 2006


Canon EOS Digital Rebel / EF 17-40mm @ 26mm
f-11 / 1/320 sec. / 200 ISO

Shot Raw and converted in DPP. Auto levels, auto contrast, USM in PSE 2.0. Watergate Hotel and the Kennedy Center in the foreground

March 21, 2006


Canon EOS Digital Rebel / EF 70-200mm @ 200mm
f-14 / 1/30 sec. / 200 ISO

Shot Raw and converted in DPP. USM in PSE 2.0. Taken across the river in Virginia.

March 16, 2006


Dallas Love

Canon EOS Digital Rebel / EF 70-200mm f-4 @ 200mm
f-6.3 / 1/500 sec. / 100 ISO

3 photos shot RAW and processed in DPP. Stitched together with Canon's Photo-Stitch. Contrast, color, saturation and some burning and dodging done in PSE 2.0

March 8, 2006


Minolta SR-T 101

Canon EOS Digital Rebel / EF 35mm 2.0
f-3.2 / 1/80 sec. / 200 ISO

Shot RAW and processed in DPP. B&W conversion via DPP as well.

My SRT 101 again. This time I am shooting for a webpage I wrote about it.
http://home.comcast.net/~camerapage/SRT101.htm

March 3, 2006


Canon EOS Digital Rebel / EF 17-40mm @ 17mm
f-6.3 / 1/80 sec. / 100 ISO

Shot RAW and converted into 5 different files in Canon's DPP. Each file was exposed differently 1-sky, 2-landscape, 3-instrument panel, 4-Kelly, 5-a B&W conversion to bring out shadow details. In PSE 2.0 the 5 files were layered and masked so each would bring out its specific properly exposed area. Once finished the file was layered onto the original.

Notes on Making & Working on Digital Photos

EOS DIGITAL REBEL
I am currently making most of my photographs with a Canon EOS Digital Rebel This is a (SLR) Single Lens Reflex camera that has the ability to use many different lenses and its complexity allows for a huge range of freedom from fully manual control to fully automated. I also have a large stable of film cameras that I enjoy using. The EOS cameras use Canon EF autofocus Lenses, I also have several adapters to allow me to use Nikon and M42 screwmount lenses.

DPP - Digital Photo Professional
I generally shoot in RAW format. This is a feature of higher end cameras and allows for you to have all the raw sensor data from the digital camera without the camera making any automated image enhancements like it would to make a .Jpg image. This RAW file really is raw data, think of it like a film negative, and must be processed in conversion software and made into a .Jpg file. This conversion software allows me to make decisions on brightness, tone, contrast, color temperature, color saturation, and grain sharpness. By allowing me to make these decisions I can fine tune my pictures, sometimes far better than the logic built into the camera. I use Canon's own free Raw conversion program Digital Photo Professional .

PSE 2.0 - PhotoShop Elements version 2.0
Once the RAW negative is processed I often use Adobe Photoshop Elements 2.0 to make some touch-ups. Photoshop allows me to make changes to smaller sections of a photo that might need a brightness adjustment or a color adjustment. I also use the Layers tools to help increase dynamic range (extend the details in the light and dark areas), also layers allows me to add the borders or frames to the photos.

February 22, 2006


Canon EOS Digital Rebel / EF 17-40mm @ 17mm
f-4 / 2 sec. / 200 ISO

Shot RAW and converted in DPP. Slight touchup and frame in PSE 2.0


February 12, 2006


Canon EOS Digital Rebel / EF 70-200mm @ 200mm
f-4 / 1/60 sec. / 400 ISO

Shot Raw and converted in DPP. Auto levels, auto contrast, USM in PSE 2.0. The frame is new for me too! My first one. I copied it from someone else painted it black and pasted my photo and caption into it. Hopefully I will figure out how to make them soon.

February 11, 2006


Southwest at San Diego
EOS Digital Rebel / EF 70-200mm 4 @ 73mm
f-8.0 / 1/320 sec. / 100 ISO

Shot RAW and post processed in DPP.


February 2, 2006


Nap Time

Canon EOS Digital Rebel / EF 70-200mm @200
f-4 / 1/200 sec. / 400 ISO

Shot RAW and processed in DPP.

January 31, 2006


Ikoflex Ia
EOS Digital Rebel / EF 70-200mm 4.0
f-4.0 / 1/25 sec. / 400 ISO

Shot RAW and processed into B&W with DPP. Straightened and touched up in PSE 2.0

My favorite still life subject has been my cameras. I have been shooting them with varying degrees of success since I first got my first SLR a Canon EOS 650 (the first EOS model) and much later with my first digital a Canon A50. Now with my D-Rebel things are only getting better......

See more of my 1956 Ikoflex here on my "Ikoflex page".

January 27, 2006


Fast Glass

EOS Digital Rebel / EF 35mm 2.0
f-22 / 3.2 sec. / 100 ISO

Shot RAW and processed in DPP. No fancy processing.
The setup for the shot was both cameras on a turntable. A long 3.2 second exposure was made as the turntable was moved back and forth to give the background the feel of high speed. I also find a longer exposure gives a nicer rendering of the glass in the lens. Although I did get the look I was aiming for, it is not as obvious or dramatic as I had hoped for. Perhaps the background needs to have more variation than what I was using.

The camera is the venerable Minolta SRT 101, a great camera that was probably Minolta's best seller ever. The lens is Minolta's fastest! Minolta made the 58mm lens when others made 50mm's. One big advantage of 58mm is that it is exactly the same perspective as the human eye. If you have one eye looking through the viewfinder and the other open they will see the same. The 58mm 1.2 was made in 1969 when high speed films were ASA 400 and very grainy!, so the super fast glass meant a lot more back then than it does today with out great high speed films.

January 15, 2006


Sabrina with a Banana
EOS Digital Rebel / EF 35mm 2.0
f-2.0 / 1/30 sec. / 100 ISO

Shot RAW and straight from DPP.

January 12, 2006


Saint Louis at Dawn
EOS Digital Rebel / EF 35mm 2.0
f-2.0 / 1/25 sec. / 1600 ISO

Early morning departure out of STL. Luckly I had my brand new 35mm lens handy!

Shot RAW and Processed 2x in DPP to increase dynamic range and 1x B&W for contrast and sharpness. Layered togother in PhotoShop Elements 2.0

January 05, 2006


Santa Monica at Sunset
EOS Digital Rebel / Canon EF 17-40mm
f-4.0 / 0.5 sec. / 400 ISO

Spent the day in Santa Monica, California. The sunset was fantastic, and lasted for over an hour!

Shot in RAW and processed with Canon's Digital Photo Pro (DPP) a few dead pixels were cleaned up with the cloneing tool, otherwise as shot.

Welcome

Hello and welcome to my Photo A Week project....

I hope to take, process, and post a photo here every week. Hopefully it will be a fun challenge for me to do this. I also hope to document how I worked on the posted photo. I think it will also help me document my growth as an artist...